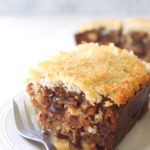
Sugar Free Apple Date Cake With Coconut Topping
Easy to make, healthy, melt-in-the-mouth texture, caramel-toffee flavour from the sweet date/tart apples, the to-die-for chewy topping.
It can be made a few days ahead of time, in fact it just gets better as the flavours enhance over time! It freezes brilliantly too.
Ingredients
- FOR THE CAKE:
- 4 medium green apples (I use golden delicious) , peeled and chopped small
- 250 g (2 cups) pitted dates, chopped small
- 1 1/2 tsp bicarb
- 1 cup boiling water
- 1 3/4 cups cake flour
- pinch of salt
- 120 g (1/2 cup) coconut oil, softened
- 1 egg, lightly beaten
- 2 tsp vanilla extract
- FOR THE COCONUT TOPPING:
- 3 tbsp coconut oil
- 3 tbsp honey, or maple syrup
- 2 tbsp almond milk, or coconut milk
- 1 cup desiccated coconut, unsweetened
-
TO MAKE THE CAKE:
-
Preheat oven to 180°C (350°F), grease and lightly flour an 8 inch (20cm) square (or round) cake tin.
-
In a bowl, place apples, dates, baking soda and boiling water, give it a gentle stir and set aside to cool for about 18 – 20 minutes until the dates are nice and soft, stir occasionally.
-
In another bowl, sift the flour and salt together.
-
Once the apple date mixture has cooled, stir the coconut oil, egg and vanilla into the apple date mixture.
-
With a metal spoon, stir the sifted flour and salt gradually (about 4 tablespoons at a time) into the apple date mixture until all the flour is combined. Spoon the cake mixture into the cake tin and level out. Bake for 30 mins.
-
TO MAKE THE COCONUT TOPPING:
-
In the microwave, gently melt coconut oil and honey together, once the mixture is liquid, take out the microwave, and stir in the almond milk and desiccated coconut, mix together well.
-
Spoon coconut topping over the baked cake, and press down with the back of a metal spoon to get an even layer. Return cake to the oven until the topping is golden, about 10 mins, keep an eye on it, it browns quickly.
-
Place the cake on a cooling rack and allow to cool in the cake tin, then slice into squares, gently lift out with a spatula or cake flip, and serve.
NotesI like to check the cake halfway through cooking time, if it’s already golden enough, which it might be depending on your oven, cover the top with a piece of silver foil and continue baking.
This cake is delicious as a dessert! Serve warm with whipped cream or ice-cream – YUM. I also like it straight out the fridge in summer, it’s absolutely delicious either way!